Python with CivilFEM
All functions enabled by CivilFEM interface can be implemented through Python code, using the script editor or the command line. All Python functions can be used in CivilFEM, including Python libraries.
Basic Types
In addition to the basic Python types, CivilFEM includes some classes to make the script easier to use.
Point: Coordinates of points and units.
myPoint = Point(0,5,2,"m")
print(myPoint.x()) # As a python float
print(myPoint.y()) # As a python float
print(myPoint.z()) # As a python float
print(myPoint.getUnit()) # As a python string
print(myPoint.getFormula()) # As CivilFEM class Formula
A subtype for 2d models is available, Point2d:
myPoint2d = Point2d(0,5,"m")
Vector: Coordinates of vectors.
myVector = Vector(1,0,0)
print(myVector.x()) # As a python float
print(myVector.y()) # As a python float
print(myVector.z()) # As a python float
print(myVector.getUnit()) # As a python string
print(myVector.getFormula()) # As CivilFEM class Formula
A subtype for 2d models is available, Vector2d:
myVector2d = Vector2d(0,5,"m")
Double: It’s a class like a float customized to manage units.
myDouble = Double(15,"mm")
print(myDouble.getValue()) # As a python float
print(myDouble.getValueUnit("m")) # As a python float with unit conversion
print(myDouble.getUnit()) # As a python string
print(myDouble.getFormula()) # As CivilFEM class Formula
Formula: Creates a CivilFEM formula to write a formula for a point, vector or double.
myFormula = Formula("(8*9/6,0,0)")
myPoint = Point(myFormula) # Creates a point object using the formula
print(myPoint.getFormula()) # Obtains the Formula object of a point
Containers (List, Array, Table): Special classes used to pass arguments and modify properties of CivilFEM objects. Python lists are converted to these types for convenience when needed.
civilFEMList = List()

civilFEMList.push(1)
civilFEMList.push(2)
civilFEMList.push(3)

civilFEMList.front() # 1
civilFEMList.back() # 3

civilFEMList.size() # 3
civilFEMList.empty() # False

# index access
civilFEMList[0] # 1
civilFEMList[1] # 2
civilFEMList[2] # 4
The Array structure is almost equivalent to a List. The difference is that the Array is more efficient in indexed access (constant access) while the List has to go through all the elements until it reaches the index value.
myList = List()
myArray = Array()

# Filling of both objects ....

myList[17000] # Slow
myArray[17000] # Faster
The Table structure is mostly used to access/edit existing data:
myMaterial = Material("C25/30") # Obtains the material object
mySSList = myMaterial.DSSD.SSDList # Obtains the list of design diagrams
mySSTable = mySSList[0].SSData # Access the design diagram table

mySSTable.setTableUnit("kPa") # Change the unit of cell values
mySSTable.set(6, 0, 7690.653573) # Change the value in row 6 and column 0

numRows = mySSTable.getNumRows()
numColumns = mySSTable.getNumCols()

# Iterate over the table
for row in range(0, numRows):
	for col in range(0, numColumns):
		cellValue = mySSTable.get(row, col)
		print(cellValue)

# Add a new column
columnPosition = 2
mySSTable.insertCol(columnPosition)

# Add a new row
rowPosition = 4
mySSTable.insertRow(rowPosition)
Warning
These basic types are considered reserved words.
Script Editor and Command Line
CivilFEM has its own Script Editor to run Python code and create it without requiring external editors. It is located in the main screen of CivilFEM, in “View” section, inside the “Windows” menu. Furthermore, CivilFEM has a Command Line that allows running Python code and some special commands for the script. This command line is located on the same place as the script editor.

Location of the activation tabs of Command Line and Script Editor
The Script Editor has its own menu, where the script can be saved; an existing script can be opened, or the script can be run and stop. Script Editor has several shortcuts, which are listed below.
F5 = run script
ctr+A = select all
ctr+S = save script
ctr+O = open script
ctr+N = new script
ctr+C = copy
ctr+V = paste
ctr+X = cut
ctr+Z = undo
ctr+y = redo
ctr+q = comment the line
shift+F10 = options In addition to these shortcuts, the Script Editor also has autocomplete function. This is enabled by pressing ctr+space when you start writing in the script editor.
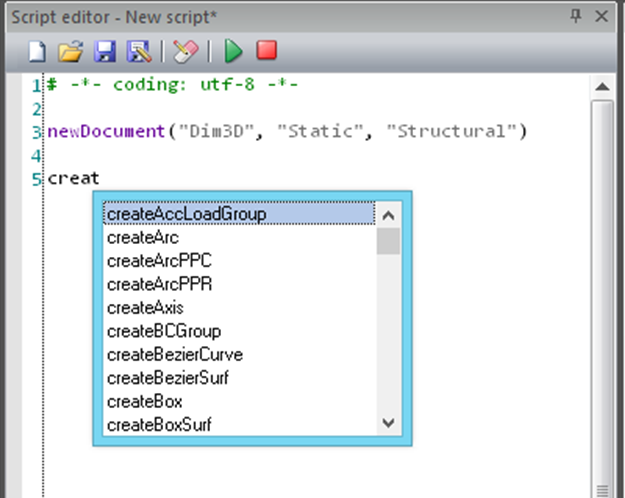
Autocomplete function
As a complement to autocompletion of the script editor, there is .help() function, with which the output attributes of each class are shown. For example, to show boundary conditions attributes, execute BCGroupsContainer.Find(“BC”).BCs[0].help() in the script editor o in the command line. In the Output window will be printed the attributes like this:
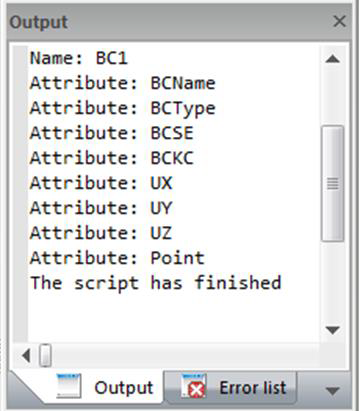
BC attributes
The most characteristic feature in the command line is capability of executing only selected lines of scripts. With the command run you can execute certain lines of code, only is need to type run and the number of the lines in quotes. Something important to keep in mind is that you should always write the starting line and the end one, so if for example, you want to run only line 5 would be type as follows:
run "5" "5"
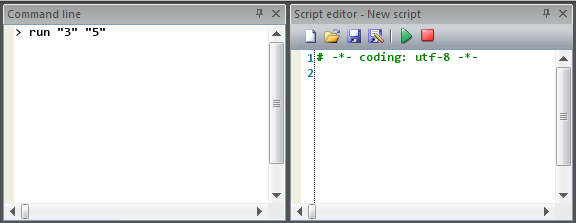
Command Line and Script Editor Windows
Macro Recording
CivilFEM has the option to record the processes, in Python language, involved to create the model using the interface, this recording is done by macros. The macro is located in the main screen of CivilFEM, in the “View” section inside “Macros”, there you can start, stop and view it.
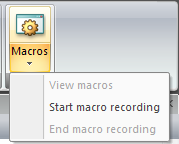
Macros location
Keep in mind that the macro recording is performed in the document units and configuration. When using the CivilFEM script, it is not necessary to know each of the entities and their attributes beforehand. It is advisable to focus on what needs to be done and record commands through the interface performing the task at hand. This provides a template with the information needed to build parts of a script that will do what you are looking for. Suppose we have 30 springs, and we want to change the activation time according to their type. It is a repetitive task that would take a long time to be done through the user interface - how do we do it in Python? What attributes do we have to use? How do we access the entities? The best procedure is to carry out the operation once through the interface, recording macro, and from that create the script. For example, after activating the recording, modifying the spring type and the activation time, we force to record the access to these attributes:
# -*- coding: utf-8 -*-
ConfigUnits.System = "IS"
modelUtil0 = ModelUtil("Damper12")
modelUtil0.ActTime = Double(2)
modelUtil0.SpringType = "ToGround"
modelUtil0.SpringType = "TrueDirection"
With this recording we already know how to obtain the entity and how to access its attributes, we can create a script like the following:
for mu in ModelUtilsContainer:
	if (mu.getType() == "Spring"):
		if (mu.ActTime.getValue() > 80.0):
			mu.SpringType = "TrueDirection"
		else:
			mu.SpringType = "ToGround"
Script Manual: API
All necessary information to make Python code in CivilFEM (enumerates, commands, containers and other options) are covered in the Script Manual. The Script Manual is divided in the same way that CivilFEM program, to ensure easier and faster to find commands. It contains all commands and arguments to create the model, as well as all enumerates for units, results and CivilFEM’s libraries. With macro recording and API search, it should be enough to automate tasks in CivilFEM, without having prior knowledge of their use. Enumerates and arguments All enumerates and name arguments used in Python with CivilFEM are default, and must be written as detailed in the Script Manual, because otherwise the program will not recognize them. It should also be in mind that each command has the same model restrictions as the interface model, being unable, for example, to execute 2-dimensions commands in three-dimensional models, or transient commands in harmonic models. Parameters CivilFEM has its own parameters, which are also available through Python code. To create, modify and delete a parameter, proceed as follows:
createParam("Param","VECTOR2D","Global Cartesian","[9, 0]","m")
modifyParam("Param", "Global Cartesian","[5, 1]", "mm")
deleteParam("P")
To get the parameter value, build the corresponding basic type with a Formula:
createParam("MyDouble","DOUBLE","5","m")
example1 = Double("MyDouble")
createParam("MyV3d","VECTOR3D","Global Cartesian","(9,0,1)","m")
example2 = Vector("MyV3d")
createParam("MyP3d","POINT3D","Global Cartesian","(9,0,1)","m")
example3 = Point("MyP3d")
createParam("MyV2d","VECTOR2D","Global Cartesian","[9, 0]","m")
example4 = Vector2d("MyV2d")
createParam("MyP2d","POINT2D","Global Cartesian","[9, 0]","m")
example5 = Point2d("MyP2d")
createParam("MyInteger","INTEGER","5","Undef")
example6 = Int("MyInteger")
Then you can get the value with:
example1.getValue()
print(example1.getValue())
Containers
All entities’ properties are accessible through their containers. There are the following:
CoordSystemsContainer
GeometryContainer
MaterialsContainer
SectionsContainer
StructuralElementsContainer
ModelUtilsContainer
ContactsContainer
LoadGroupsContainer
BCGroupsContainer
LoadCasesContainer
ParametersContainer
SelectionGroupsContainer
UserViewsContainer
ClippingContainer
UserLabelContainer
You can obtain an entity of a container by its name with the following helper commands:
CoordSystem
Geometry
Material
Section
StructualElement
ModelUtil
Contact
LoadGroup
BCGroup
LoadCase
Parameter
SelectionGroup
UserView
ClippingPlane
UserLabel
#.Find("Name of the Structural Element")
mySE = StructuralElementsContainer.Find("Structural element")

# Another way to find an object
mySE = StructuralElement("Name of the Structural Element")

# Properties can be accessed as attributes of mySE, and modified with assignment
mySE.MeshTool2D.ParameterMesh.SizeEdges = Double(0.12)
If you want to change one or more properties of multiple entities at the same time, you can iterate the container. For example, if we have created several points and lines, and we want to change the name of the points without changing lines, the code would be as follows:
i = 0
for geom in GeometryContainer:
	if geom.GeomType == "VertexByCoord":
		geom.GeomName= "RenamePoint" + str(i+1)
		i = i + 1
Pay special attention to the possibility of creating an infinite loop. If you have in the iterator a CivilFEM command, you can stop the execution with the stop running script bottom. Comparisons in the containers can be made by “==”. To change the name of several point with x coordinate 2, proceed as follows:
i = 0
for g in GeometryContainer:
	if (g.GeomType == "VertexByCoord") and (geom.Pnt.x() == 2):
		g.GeomName="renamePoint" + str(i+1)
		i = i + 1
In comparisons of Point(), Double() and Vector(), must be set the units. Another type of filtering can be done using the “getType” method of the entities. For example, to filter the type of structural elements when traversing them with the container:
for se in StructualElementsContainer:
	if (se.getType() == 'Beam'):
		print(se.Name + " is beam")
	else:
		print(se.Name + " is not beam)
Model Groups
It is also possible to iterate on entities of a model group container. That is, the user may add a new model group to any of the predefined model groups, iterating on their entities, if required. For instance, a new model group might be added to the Structural elements container:
createModelGroup(StructuralElementsContainer,"Steel bars")
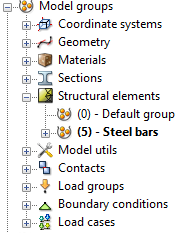
So, for example, if it becomes necessary to test if any of the entities of the “Steel bars” Structural element model group is shaped by vector (1, 0, 0) in Z direction:
a = StructuralElementsModelGroup("Steel bars")
steelBarsContainerList = a.getEntities()
for steelBar in steelBarsContainerList:
	xVectorCoor = steelBar.KClinear.ZVector.x()
	yVectorCoor = steelBar.KClinear.ZVector.y()
	zVectorCoor = steelBar.KClinear.ZVector.z()
	if (xVectorCoor==1) and (yVectorCoor==0) and (zVectorCoor==0):
		return True
Therefore, in the event that this condition is fulfilled, program will output the “True” statement. To sum up, this utility allows the user working only on the required entities, instead of the whole amount of them, by entering these ones in a new model group and applying a loop along with a condition. Selection Groups The CivilFEM selection can also be handled from Python. You can get the selected entities for use in commands or change the value of attributes. Access to them is done as follows:
# Assuming that we have created these structural elements
se0 = StructuralElement("BEAM5")
se1 = StructuralElement("BEAM1")
se2 = StructuralElement("BEAM9")

# Perform a selection and create a selection group
selectByPick("Structural","NewSelection",[se0,se1,se2]) # Set the current selection
createSelectionGroup("SE") # Create a selection group from the current selection

mySelectionGroup = SelectionGroup("SE") # You can get the selection group by its name
mySelectionGroup = SelectionGroupsContainer.CurrentSelectionGroup # Another way to get the selection group by the current selection group

mySEList = mySelectionGroup.getSelection()
for se in mySEList:
	print(se.Name)
You can change the current selection using: selectByPick, selectByLoc/X/Y/Z, selectByNum, selectByNodeGroup, selectByLC, selectByMat. To check the arguments and additional information about these commands look at the API documentation. Logs These methods can be used to write to the CivilFEM output. Note that the error log will stop the execution of the script.
Log("Test message")

if (criterion < 1.0):
	LogError("Invalid")

if (thickness > 5.0):
	LogWarning("Thickness too high")
External editors
Support for autocompletion functionality and help can be obtained in external editors as follows:
There is a cfdoc.py file that can be imported into user Python code.
The file cfdoc.py can be found in “CivilFEMInstallDir/manual/script/python/cfdoc.py”
This file provides the documented CivilFEM classes and functions with help, but no functionality, just for the purpose of helping you write code.
User code at startup
If you want user code to be executed when you open the program, it can be installed in the “CivilFEMInstallDir/res/Scripts/” directory.
Every single Python file will be executed by CivilFEM.
Warning
These files can affect the opening of CivilFEM if they contain code with errors.