Results (Post)
Derived Results
Derived results are also available in python code besides the derived results window. A small example is shown below:
der = DerivedResults()
der.addFiles("Derived1","LC1.rcf")
der.ModifiedFiles[0].NodalResults.enableResult("UTx", True)
der.ModifiedFiles[0].NodalResults.UTx = 5
der.ModifiedFiles[0].BeamResults.Sx = 2.6
der.ModifiedFiles[0].ShellResults.Sy = 8
der.ModifiedFiles[0].SolidResults.Ex = 10
The upper code adds an existing results file with a different name to modify the results factor, and modify nodal, beam, shell and solid results by changing the factor of displacements (UTx), stress (Sx), etc. To create the Derived result we need to execute the create command:
der.createDerivedResults(r"C:\CivilFEM\")
Code can be generated by using the derived results window buttons to save by script or recording macro from the view tab and generating derived results.
Envelope
To create an envelope of CivilFEM results, it is necessary to generate a results file, and set if the expected results are maximum or minimum, the name of the envelope and its file path and the results file paths as follows:
env = Envelope()
env.resultsFile(r"LC1.rcf")
env.envelopeOptions("Movements","Min") #Defined in Script Manual
env.createEnvelope("C:\CivilFEM\ENVELOPE.rcf")
or to create a concomitant envelope:
env.envelopeTargetOptions("Comparison", "Min")
env.envelopeTargetOptions("StructuralElement", "Shell")
env.envelopeTargetOptions("Result", "SF3")
env.createTargetEnvelope("C:\CivilFEM\ENVELOPEConcomitant.rcf")
Code Combinations
Code combinations can be scripted. You can simulate the behavior of the window using commands. The first step is to load the results files into the CivilFEM loader:
loadResultsFile(r"E:\Model\1-AccidentalLoad.rcf")
loadResultsFile(r"E:\Model\2-VariableLoad.rcf")
loadResultsFile(r"E:\Model\3.1-PermanentLoad.rcf")
loadResultsFile(r"E:\Model\3.2-PermanentLoad.rcf")
loadResultsFile(r"E:\Model\4.1-VariableLoad.rcf")
loadResultsFile(r"E:\Model\4.2-VariableLoad.rcf")
loadResultsFile(r"E:\Model\4-SeismicLoad.rcf")
openResultsFile(r"E:\Model\3.1-PermanentLoad.rcf") # Optional, load a result in the ribbon bar.
With results loaded you can perform a code combination with:
# Object creation
cmb0 = CodeCombination()

# Defining loads
# Each float number represent a column of the window
cmb0.addPermanentLoad(r"3.1-PermanentLoad", 0, 1, 0, 1, 0, 1)
cmb0.addPermanentLoad(r"3.2-PermanentLoad", 0, 1, 0, 1, 0, 1)
cmb0.addVariableLoad(r"2-VariableLoad", 0, 1, 0, 1, 0, 1, 1, 1, 1, 1)
cmb0.addVariableLoad(r"4.1-VariableLoad", 0, 1, 0, 1, 0, 1, 1, 1, 1, 1)
cmb0.addVariableLoad(r"4.2-VariableLoad", 0, 1, 0, 1, 0, 1, 1, 1, 1, 1)
cmb0.addAccidentalLoad(r"1-AccidentalLoad", 0, 1)
cmb0.addSeismicLoad(r"4-SeismicLoad", 0, 1, 1)

# Compatibilities
# Set the compatibility state between loads, if some compatibility is not set, a default value will be used
cmb0.setCompatibleLoads(r"2-VariableLoad", r"4.1-VariableLoad", True)
cmb0.setCompatibleLoads(r"2-VariableLoad", r"4.2-VariableLoad", False)
cmb0.setCompatibleLoads(r"2-VariableLoad", r"1-AccidentalLoad", True)
cmb0.setCompatibleLoads(r"2-VariableLoad", r"4-SeismicLoad", True)
cmb0.setCompatibleLoads(r"4.1-VariableLoad", r"4.2-VariableLoad", True)
cmb0.setCompatibleLoads(r"4.1-VariableLoad", r"1-AccidentalLoad", True)
cmb0.setCompatibleLoads(r"4.1-VariableLoad", r"4-SeismicLoad", True)
cmb0.setCompatibleLoads(r"4.2-VariableLoad", r"1-AccidentalLoad", True)
cmb0.setCompatibleLoads(r"4.2-VariableLoad", r"4-SeismicLoad", True)
cmb0.setCompatibleLoads(r"1-AccidentalLoad", r"4-SeismicLoad", True)

# Not concomitance
cmb0.addNotConcomitance(r"2-VariableLoad", [r"4.1-VariableLoad"])

# Persistent configurations are saved in the model, so you can load one condifugration stored from another
# python object or created in the window
cmb0.savePersistentData(r"Code combinations settings")
# Example of loading an existing configuration: cmb0.loadPersistentData(r"Code combinations settings")

# You can set options like filtering
cmb0.filterRepeats()

# Generate a document with the equations
cmb0.generateDocument("MyText.txt")

# And finally, calculate the combinations that will be stored in the given folder
cmb0.calculateCombinations(r"E:\Model\Combinations")
User Combinations
User linear combinations are also available in python code besides the combination window. A small example is shown below:
comb = UserCombination()
comb.addCombination("COMBI_1")
comb.Combination[0].addEquation(r"LC1.rcf", 2.5)
comb.Combination[0].addEquation(r"LC2.rcf", 3.5)
comb.addCombination("COMBI_2")
comb.Combination[1].addEquation(r"LC3.rcf", 10.0)
The upper code opens a User Combination, adds two new combinations “COMBI_1” and “COMBI_2” and three new equations, two of them added to COMBI_1 and one to COMBI_2. To create the User Combination we need to save it, and to get combinations results we need to create them as follows:
comb.saveUserCombination(r"C:\CivilFEM\userComb.uccf")
comb.createCombination(r"C:\CivilFEM\\")
Once everything is created, you can load existing files and remove or modify and save them.
comb.loadUserCombination(r"C:\CivilFEM\userComb.uccf")
comb.Combination[0].Equation[0].Coefficient = 5.5
comb.Combination[0].removeEquation(1)
comb.removeCombination("COMBI_2")
comb.saveUserCombination(r"C:\CivilFEM\userComb2.uccf")
Checking and Design
CivilFEM features checks of concrete and steel beams and concrete plates are also accessible via Python code through their own commands. For example to check in axial bending a concrete beam, open results file and proceed has follows:
#Name, concrete stress, steel stress, dirkey
checkConcreteBeamAxialBending("Check", 0, 0,"XY")
To design in axial bending a concrete beam, open results file and proceed as follows:
#Name,Concrete stress,Steel stress,Min amount,Max amount,Dirkey designConcreteBeamAxialBending(“Design”,0,0,0.5,2,”XY”)
Interaction Diagrams
To create an Interaction Diagram of beams or shells and save it, proceed as follows:
#BEAMS
#Element, End, concrete stress, steel stress, dirkey
beamInteractionDiagram(1,0,Double(0),Double(0),"XY","Spiral")
interactionDiagramSnapshot(r".\DiagramBeam.bmp")
#SHELLS
#Element, End, concrete stress, steel stress, dirkey
shellInteractionDiagram(1,1,Double(0),Double(0),"X")
interactionDiagramSnapshot(r".\DiagramShell.bmp")
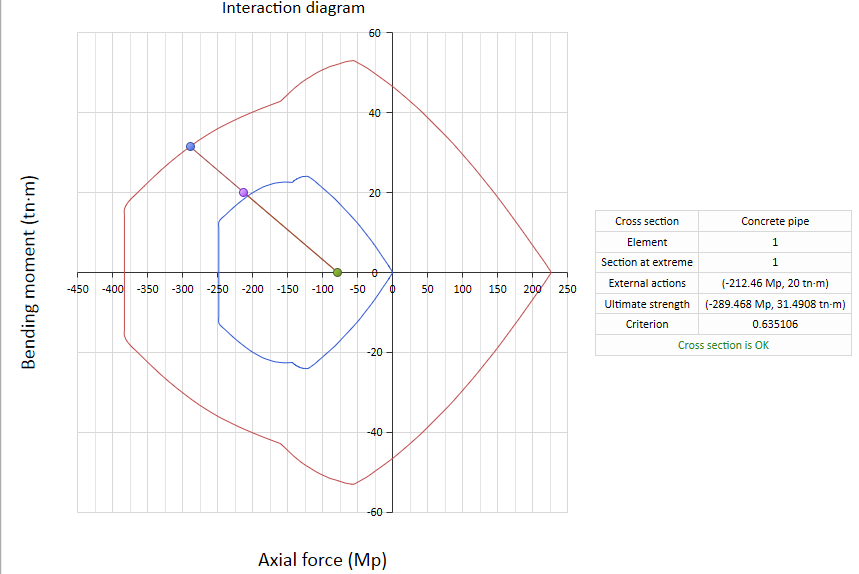
Snapshot of a concrete pipe interaction diagram
Rendered Mesh
When a result is displayed in the 3D view, information can be extracted from the rendered mesh as well as the color scale. This guided example shows how when solving a model, a result is displayed in the 3D view and the extractable information is printed.
# Solve the model
solve()

# Make sure the results are plotted
plotResults()

# Create the object to extract data from the rendered mesh
renderMesh = getRenderMesh()

# First get the scale data
print("Scale title: " + str(renderMesh.getScaleTitle()))
print("Scale unit magnitude: " + str(renderMesh.getScaleUnitMagnitude()))
print("Scale unit item: " + str(renderMesh.getScaleUnitItem()))
print("Scale max value: " + str(renderMesh.getScaleMaxValue()))
print("Scale min value: " + str(renderMesh.getScaleMinValue()))
print("Scale max valid texel: " + str(renderMesh.getScaleMaxTexel()))
print("Scale min valid texel: " + str(renderMesh.getScaleMinTexel()))

# Travel for each structural element
for se in StructuralElementsContainer:
	name = se.Name
	print("SE Name: " + str(name))
	print("========")

	# Vertices
	vertices = renderMesh.getVertices(name)
	print("Vertices: " + str(int(len(vertices) / 3)))
	for i in range(0, len(vertices),3):
		print("V" + str(i / 3) + ": x -> " + str(vertices[i]) + " y -> " + str(vertices[i + 1]) + " z -> " + str(vertices[i + 2]))

	# Texels
	texels = renderMesh.getVerticesTexels(name)
	print("Texels: " + str(len(texels)))
	for i in range(len(texels)):
		print("Texel for V" + str(i) + ": " + str(texels[i]))

	# Faces
	elemIds = getSEElementsId(se)
	for elemId in elemIds:
		faceIds = renderMesh.getFaceIdsFromElement(name, elemId)
		faceIdsStr = "        "
		for faceId in faceIds:
			faceIdsStr += str(faceId) + ", "
		print(f"Face ids for {str(elemId)}: " + faceIdsStr)

		for faceId in faceIds:
			faceVertexIndices = renderMesh.getIndicesFromFaceId(name, faceId)
			vertexIndicesStr = "        "
			for vertexIndex in faceVertexIndices:
				vertexIndicesStr += str(vertexIndex) + ", "
			print(f"Vertex indices for face Id {str(faceId)} ({str(len(faceVertexIndices))}): " + vertexIndicesStr)

			vertexValuesStr = "         "
			for vertexIndex in faceVertexIndices:
				print(f"    Face {str(faceId)} V" + str(vertexIndex) + ": x -> " + str(vertices[vertexIndex * 3]) + " y -> " + str(vertices[vertexIndex * 3 + 1]) + " z -> " + str(vertices[vertexIndex * 3 + 2]))
Alternatively, you can export all data to a JSON file:
# Create the object to extract data from the rendered mesh
renderMesh = getRenderMesh()

# Export all data to JSON
renderMesh.exportToJSON(TesterOutputPath(r"PruebaJSON.json"))